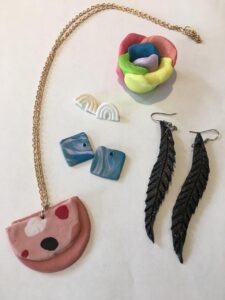
 Well, if there was one art material that I simply could not live without it would be polymer clay. There are countless possibilities from jewelry, bowls, ornaments, miniatures, cake toppers (DO NOT EAT), to high end art pieces worthy of a museum. It’s versatile, durable, and the results are almost guaranteed, whether you’re a beginner or a skilled artist. Basically, polymers are non-toxic synthetic modeling clays that can be molded and re-worked until you decide to make it permanently cured by hardening it in a low temp oven. There are many brands, each with a slightly different set of attributes, such as hardness and baking time. It’s really a matter of finding the one that’s right for your project. My advice is if you are a child or beginner stick with the varieties that are softer, such as Sculpey, which you can find at any crafting store. Beyond a huge assortment of colors, there are options for metallics, fluorescents, and clays with glitter. There’s no limit to what you can do but I wanted to share the basic tips to get you started and a very simple project for the upcoming holiday.
1) This might seem obvious but wash your hands and your surface be fore working with your clay because it will pick up any dirt, lint, doghair or anything else it touches.
2) Sometime the clay is a bit hard out of the package so you will need to work it: squeeze, pound, roll, and twist it. The warmth of your hands will also help to condition the clay.
3) Although greatness can be achieved with just the use of your hands, things like a rolling pin, stamps, straws, an old comb, toothbrush, tweezers, toothpicks, etc. can all be used for creating textures and details. Although you can buy a set of clay tools, a lot of things found in your kitchen can be used with the same results.
4) If you are making something larger in size, use aluminum foil to create the “core”. This saves you from using a lot of clay and keeps the cooking time short (the thicker the clay, the longer the curing time in the oven).
5) Colors can be mixed, marbleized, blended to create an ombre effect, etc. There are literally hundreds of techniques! My suggestion is to pull up tutorials and watch YouTube videos to start educating yourself on all the possibilities.
6) Once your design is made, rubbing alcohol can help create a smooth finish, free from any little bumps, cracks, or fingerprints. Just dip a paintbrush in alcohol and gently brush the surface to rid if of minor imperfections.
7) Make sure you are baking your finished creations at the right temperature and correct length of time. Follow the packaging directions.
8) Properly store your unused clay in resealable baggies or a fishing tackle box to keep it clean and from getting dried out.
9) If desired, you can paint your design after it has dried.
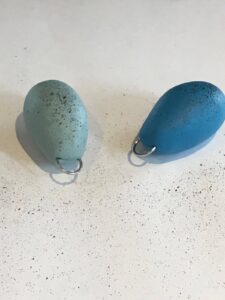
Here is a simple Easter project for this week: make your own easter egg tree for a festive table centerpiece. Create small egg-shaped clay designs using whatever technique you choose. If your plan is to hang them from a branch, make sure to first place a jump ring or insert into the egg BEFORE baking it! Try blending blues and white to make a realistic Robin’s egg shade of blue then do a light speckling using a toothbrush with a bit of brown paint. Pull back and release the bristles with your finger creating a fine mist. Dry and hang.

Check out the work of Sculpey artist extraordinaire and MMoA instructor, Liz Lomax on her MMoA Artists Share Page
Or on her website at LizLomax.com